Recent Posts
Mold in Vacation Homes: Prevention for Seasonal Propertie
11/13/2024 (Permalink)
Vacation homes offer the perfect retreat, but if left unattended, they can become breeding grounds for mold. Mold thrives in damp, dark, and warm conditions, making seasonal properties particularly vulnerable during periods of vacancy. To protect your vacation home, it's important to take preventative steps. Let’s dive into expert insights on how to prevent mold growth in your seasonal property and ensure it’s in tip-top shape when you’re ready to return.
Why Mold is a Concern in Seasonal Homes
When a vacation home sits empty for weeks or months, the chances of mold developing increase significantly. According to the Environmental Protection Agency (EPA), mold can begin growing within 24-48 hours of exposure to moisture. Without proper ventilation or moisture control, a seasonal property can create the perfect environment for mold to thrive.
Preventing mold growth in your vacation home should be a priority to avoid extensive property damage and costly repairs.
Key Tips for Preventing Mold in Seasonal Properties
Here are some steps you can take to safeguard your seasonal home from mold:
- Control humidity levels: Mold needs moisture to grow, so it’s crucial to keep humidity levels low. Use a dehumidifier to maintain humidity below 60%.
- Inspect for leaks: Check your property for any leaks in the roof, windows, or plumbing before leaving. Fixing leaks immediately can prevent water accumulation, which is a major cause of mold.
- Ventilation is key: Ensure proper airflow throughout the home. Use exhaust fans in bathrooms and kitchens, and leave interior doors open for air circulation.
- Clean gutters regularly: Blocked gutters can cause water to pool around your home’s foundation, which may lead to mold growth. Clean your gutters before leaving to avoid this issue.
- Invest in moisture barriers: Use moisture-resistant materials, especially in basements and crawl spaces, to keep water at bay.
The Importance of a Regular Maintenance Schedule
Having a trusted local service perform routine maintenance can prevent mold issues while you’re away. Seasonal checks should include plumbing, HVAC systems, and ventilation inspections. Additionally, ensure that the property is winterized, if applicable, to minimize moisture buildup during colder months.
Consider Professional Mold Prevention Services
If you want to go the extra mile, hiring a professional service like SERVPRO® of Worcester can provide expert mold prevention and remediation for your vacation home. With professional inspection and remediation, you can rest assured knowing your seasonal property is protected from mold growth.
By following these tips, you can reduce the risk of mold in your vacation home and enjoy your time there worry-free. Prevention is the best strategy to ensure your seasonal property remains mold-free year-round.
Protecting Your Home: Long-Term Water Damage Prevention Strategies
10/16/2024 (Permalink)
 By implementing proactive measures, you can protect your home from the devastating effects of water damage.
Water damage is a homeowner's worst nightmare in Worcester, MA, with the potential to cause significant structural issues and costly repairs. While restoration companies can help repair the immediate damage, prevention is key to safeguarding your property in the long term. By implementing proactive measures, you can protect your home from the devastating effects of water damage.
Understanding the Risks of Water Damage
Water damage can arise from various sources, including leaking pipes, faulty appliances, and natural disasters. What often begins as a small issue can quickly escalate into a major problem if not addressed promptly. According to an Insurance Information Institute study, water damage and freezing account for almost 24 percent of all homeowner insurance claims. This statistic underscores the importance of taking preventative action before disaster strikes.
Regular Maintenance: Your First Line of Defense
Consistent home maintenance is crucial in preventing water damage. Start by inspecting your roof annually for missing or damaged shingles that could allow water to seep into your home. Clean your gutters regularly to prevent blockages that can lead to water overflow and foundation issues.
Additionally, check your plumbing system for any signs of wear and tear. Replace old or corroded pipes, and ensure that your water heater is in good condition. A small investment in maintenance can save you from the extensive costs of water damage restoration in the future.
Key Maintenance Tips:
- Roof Inspection: Check for leaks, damaged shingles, and flashing around chimneys.
- Gutter Cleaning: Clear debris regularly to avoid blockages.
- Plumbing Checks: Inspect for leaks, corrosion, and pipe damage.
- Appliance Monitoring: Ensure that appliances like dishwashers and washing machines are functioning correctly.
Implementing Water Detection Systems
Technology plays a significant role in modern water damage prevention. Installing water leak detection systems can alert you to leaks before they become serious problems. These systems can be connected to your home’s smart devices, enabling you to monitor your home even when you’re away. Some advanced systems can even shut off your water supply automatically if a significant leak is detected, providing an extra layer of protection.
Landscaping for Water Damage Prevention
Proper landscaping is another long-term strategy to prevent water damage. Ensure that the ground around your home slopes away from the foundation to prevent water from pooling near your home. Installing a French drain or a sump pump can also help manage excess water and protect your home’s foundation from water-related issues.
Landscaping Tips:
- Grading: Ensure the soil slopes away from your home.
- French Drains: Install to divert water away from your foundation.
- Sump Pumps: Use in basements or low-lying areas to manage excess water.
Invest in Quality Materials
When building or renovating your home, opt for water-resistant materials. Choose water-resistant drywall for areas prone to moisture, such as basements or bathrooms. Investing in quality materials will reduce the likelihood of water damage and make your home more resilient in the long run.
Conclusion
Preventing water damage is not just about responding to leaks as they happen but about taking proactive steps to safeguard your home for the future. By conducting regular maintenance, implementing modern technology, landscaping effectively, and choosing quality materials, you can protect your home from the costly and often devastating effects of water damage. Taking these steps today will give you peace of mind and protect your investment for years to come.
Understanding fire damage to electrical systems and appliances
8/14/2024 (Permalink)
 For more information or to schedule a consultation, contact SERVPRO today.
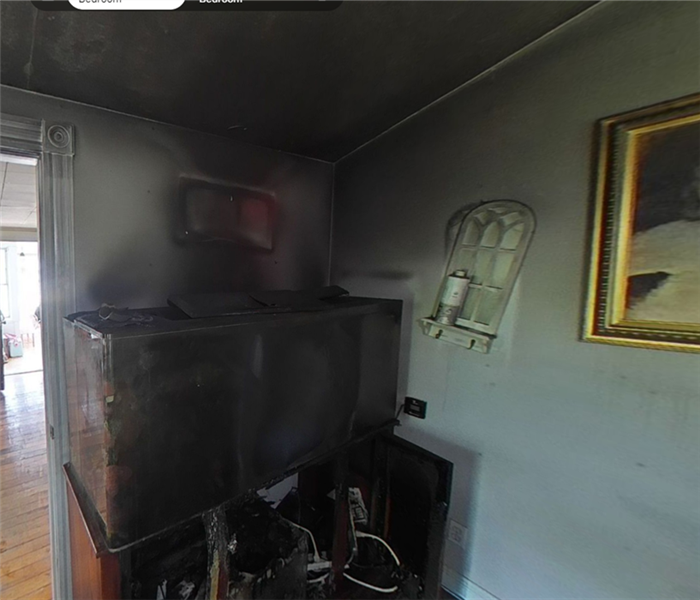
At SERVPRO®, we understand that experiencing a fire in your home or business can be devastating. Beyond the visible destruction, fire damage can significantly affect electrical systems and appliances, posing hidden hazards and long-term consequences. In this blog post, we'll explore the impact of fire on electrical systems, the steps to assess and address the damage, and why professional restoration is crucial.
The Impact of Fire on Electrical Systems
Fires generate intense heat, smoke, and soot, all of which can severely damage electrical wiring and components. The high temperatures can melt insulation, warp metals, and cause electrical short circuits. Additionally, smoke and soot contain corrosive elements that can penetrate electrical devices, leading to malfunctions or complete failures.
Assessing Electrical Damage After a Fire
- Initial Inspection: Once the fire is extinguished and it's safe to enter the property, a thorough inspection of the electrical system is essential. Look for visible signs of damage, such as charred outlets, melted wires, and damaged circuit breakers.
- Professional Evaluation: It’s critical to have a licensed electrician conduct a detailed assessment. They will check for hidden damage within walls and ceilings, ensuring all compromised wiring is identified.
- Appliance Testing: Electrical appliances exposed to fire, smoke, and soot need careful evaluation. Components like circuit boards, wiring, and connections can be damaged, even if the appliance appears intact.
Addressing Fire-Damaged Electrical Systems
- Wiring Replacement: Any wiring that has been compromised by fire or heat should be replaced. This includes not only visibly damaged wires but also those exposed to high temperatures.
- Cleaning and Decontamination: Smoke and soot residues must be meticulously cleaned from all electrical components. Special cleaning agents designed for electronics can remove corrosive particles, preventing further damage.
- Appliance Repair or Replacement: Depending on the extent of damage, appliances may need professional cleaning, repair, or replacement. It's often more cost-effective to replace severely damaged appliances.
Why Professional Restoration Matters
Hiring a professional restoration company like SERVPRO ensures that all aspects of fire damage are addressed comprehensively. Our team of experts is trained to handle complex fire damage scenarios, including electrical systems and appliances. We use advanced equipment and techniques to restore your property to pre-fire condition safely and efficiently.
Prevention and Preparedness
While it’s impossible to predict when a fire might occur, taking steps to safeguard your electrical system can mitigate potential damage. Regularly inspect electrical wiring, avoid overloading circuits, and use surge protectors to protect appliances.
In conclusion, understanding the extent of fire damage to electrical systems and appliances is crucial for ensuring the safety and functionality of your property. By conducting thorough inspections, replacing damaged components, and relying on professional restoration services, you can effectively recover from fire damage. At SERVPRO, we're here for you every step of the way, ensuring a swift and comprehensive recovery.
For more information or to schedule a consultation, contact SERVPRO today. We're here to make fire damage "Like it never even happened."™
Mold in Vacation Rentals: Ensuring Guest Safety
7/17/2024 (Permalink)
Planning a vacation getaway is always exciting. Whether it's a cozy cabin in the mountains or a beachfront condo, vacation rentals offer a home-away-from-home experience. However, as much as we focus on creating perfect memories, there's one unwelcome guest that can sneak into the picture: mold. Mold can dampen the vacation experience. At SERVPRO®, we understand the importance of guest safety and comfort, which is why we're here to share essential tips on how to tackle mold in vacation rentals effectively.
- Identify Problem Areas: The first step in mold prevention is identifying areas prone to mold growth. Check for leaks in plumbing, roofs, or windows. Inspect ventilation systems and ensure proper airflow. Pay special attention to bathrooms, kitchens, and basements, as these areas are more susceptible to moisture buildup.
- Maintain Proper Ventilation: Proper ventilation is crucial in preventing mold growth. Encourage guests to use exhaust fans in bathrooms and kitchens while cooking or showering. Additionally, keep windows open when weather permits to allow fresh air circulation throughout the rental property.
- Control Humidity Levels: Mold thrives in moist environments, so keeping humidity levels in check is essential. Invest in a dehumidifier to maintain optimal humidity levels between 30-50%. Regularly empty and clean the dehumidifier to prevent mold growth inside the unit.
- Regular Inspections and Cleaning: Conduct regular inspections to detect mold early on. Clean and disinfect bathrooms and kitchens frequently, paying attention to areas where moisture accumulates. Use mold-resistant paint in high-moisture areas to provide an extra layer of protection against mold growth.
- Promptly Address Water Damage: Water damage, whether from a leaky pipe or a roof leak, can quickly lead to mold growth if not addressed promptly. Act swiftly to repair any water damage and thoroughly dry affected areas. Consider hiring a professional restoration service like SERVPRO to ensure thorough cleanup and mold remediation.
- Educate Guests: Empower guests with knowledge about mold prevention during their stay. Provide them with information on how to maintain proper ventilation, control humidity levels, and report any signs of water damage promptly. Clear communication and proactive measures can go a long way in preventing mold growth.
- Professional Mold Remediation: Despite best efforts, mold can still find its way into vacation rentals. In such cases, it's crucial to enlist the help of professionals for mold remediation. SERVPRO offers expert mold inspection and removal services to ensure the safety and well-being of guests.
Mold in vacation rentals is a preventable issue with proper maintenance and vigilance. By implementing these tips and partnering with professionals like SERVPRO, vacation rental owners can ensure a safe and enjoyable experience for their guests. Remember, a mold-free environment is key to creating lasting memories and building a positive reputation in the hospitality industry.
A Step-by-Step Guide to Repairing Water-Damaged Walls
6/13/2024 (Permalink)
 By following these steps, you can effectively repair water-damaged walls and restore your home to its preloss condition.
Water damage to walls can occur for various reasons, including burst pipes, roof leaks, or flooding. When left untreated, water damage can lead to structural issues, mold growth, and poor indoor air quality. Fortunately, repairing water-damaged walls is a manageable task with the right approach and tools. In this guide, we'll walk you through the step-by-step process of repairing water-damaged walls, helping you restore your home to its pre-damage condition effectively.
Assess the Damage
Before beginning the repair process, carefully assess the extent of the water damage to your walls. Look for signs of water staining, swelling, or soft spots, indicating moisture intrusion and potential structural damage. Identify any areas of mold growth or mildew, as these will need to be addressed during the repair process.
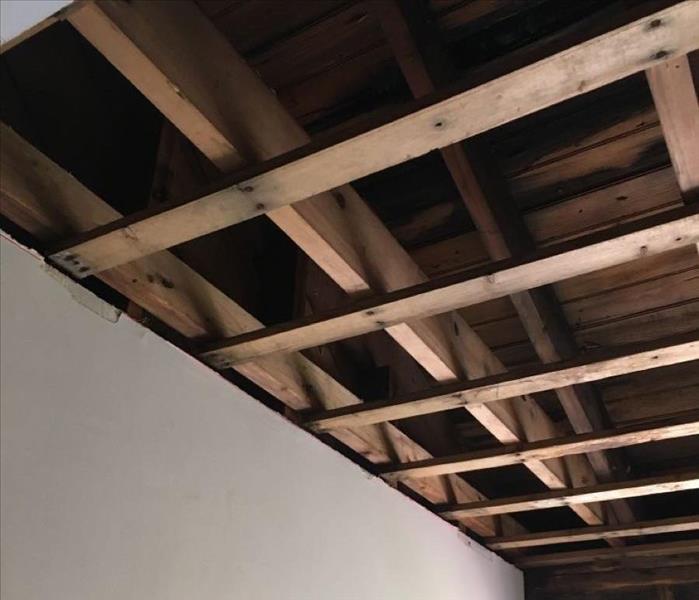
Remove Damaged Materials
Start by removing any visibly damaged materials, such as wet drywall, insulation, or baseboards. Use a utility knife or drywall saw to cut away water-damaged drywall and insulation, ensuring you remove all affected areas to prevent mold growth and further damage.
Dry the Area Thoroughly
Once damaged materials have been removed, thoroughly dry the affected area to prevent mold growth and further water damage. Use fans, dehumidifiers, and air movers to facilitate drying and improve air circulation. Monitor moisture levels regularly to ensure the area is completely dry before proceeding with repairs.
Treat Mold and Mildew
If mold or mildew is present, it's essential to treat the affected area before proceeding with repairs. Once treated, allow the area to dry completely before moving on to the next step.
Replace Damaged Materials
Once the area is dry and free of mold and mildew, it's time to replace the damaged materials. Cut new drywall to fit the affected area, ensuring a snug fit against adjoining walls and ceilings. Secure the new drywall in place using drywall screws, then tape and mud the seams to create a smooth finish.
Prime and Paint
After the drywall has been installed and finished, prime the repaired area to seal the surface and ensure proper adhesion of the paint. Once the primer has dried, apply a coat of paint to match the surrounding walls, blending the repaired area seamlessly with the rest of the room.
Monitor for Signs of Moisture
After completing the repair process, monitor the repaired area for signs of moisture or water damage regularly. Keep an eye out for water stains, mold growth, or musty odors, as these may indicate ongoing issues that require further attention.
By following these steps and taking proactive measures to address water damage promptly, you can effectively repair water-damaged walls and restore your home to its preloss condition. If you encounter extensive water damage or are unsure how to proceed with repairs, don't hesitate to contact a professional restoration company like SERVPRO of Worcester for expert assistance and reliable restoration services.
7 Steps to Prepare Your Family for Natural Disasters and Storms
5/15/2024 (Permalink)
Natural disasters and severe storms can strike without warning, leaving families vulnerable and unprepared. Taking proactive steps to prepare your household for these emergencies can help minimize risks and ensure the safety of your loved ones. Here are seven ways to prepare your family for natural disasters and storms:
1. Develop a Family Emergency Plan
Develop a comprehensive emergency plan that outlines procedures for different types of disasters, including evacuation routes, designated meeting points, and communication methods. Ensure that every family member understands their role and knows what to do in the event of an emergency.
2. Assemble an Emergency Kit
Gather essential supplies and create an emergency kit that can sustain your family for at least three days. Include items such as non-perishable food, water, first aid supplies, flashlights, batteries, blankets, and important documents. Tailor your emergency kit to meet the specific needs of your family members, including infants, elderly individuals, and pets.
3. Stay Informed
Stay informed about potential hazards and weather alerts by monitoring local news, radio broadcasts, and weather apps. Sign up for emergency alerts and notifications from local authorities to receive timely information about approaching storms or disasters. Familiarize yourself with community emergency resources and evacuation routes.
4. Prepare Your Home
Take proactive measures to protect your home from potential damage caused by natural disasters and storms. Secure loose outdoor items, trim trees and branches, reinforce windows and doors, and consider installing storm shutters or impact-resistant glass. Keep gutters and drains clear to prevent water buildup.
5. Practice Drills
Regularly practice emergency drills with your family to ensure everyone knows what to do in various scenarios. Conduct fire drills, tornado drills, and evacuation drills to reinforce emergency procedures and promote readiness. Review your emergency plan and update it as needed based on feedback and changes in circumstances.
6. Designate Communication Channels
Establish communication channels with family members, neighbors, and emergency contacts to stay connected during emergencies. Designate an out-of-state contact person whom family members can call to check in and provide updates. Ensure that everyone has a list of important phone numbers and knows how to use communication devices.
7. Find Community Resources
Take advantage of community resources and programs designed to support disaster preparedness and response efforts. Attend preparedness workshops, participate in neighborhood watch programs, and collaborate with local emergency management agencies to stay informed and engaged.
By taking proactive steps to prepare your family for natural disasters and storms, you can minimize risks and enhance resilience in the face of adversity. Creating a comprehensive emergency plan, assembling an emergency kit, staying informed, fortifying your home, practicing emergency drills, establishing communication channels, and leveraging community resources are essential components of effective preparedness. Remember, being prepared can make all the difference in ensuring the safety and well-being of your family during challenging times.
Seeing Through the Smoke: The Benefits of Thermal Imaging in Fire Damage Restoration
4/17/2024 (Permalink)
When it comes to restoring a home after a fire, every detail matters. One tool that has revolutionized the fire damage restoration process is thermal imaging. This technology allows restoration professionals to see beyond the visible damage, providing invaluable insights that can make all the difference in the restoration process. Let's explore some of the benefits of using thermal imaging in fire damage restoration.
Early Detection of Hidden Damage
Thermal imaging allows restoration professionals to detect hidden damage that may not be visible to the naked eye. By capturing infrared radiation emitted by objects, thermal cameras can identify areas of heat and moisture that indicate potential damage. This early detection enables restoration teams to address issues before they escalate, preventing further damage and reducing the overall cost of restoration.
Accurate Assessment of Structural Integrity
After a fire, assessing the structural integrity of a home is crucial for ensuring its safety and stability. Thermal imaging can help restoration professionals identify areas of concern, such as weakened support beams or compromised building materials. By accurately assessing the extent of structural damage, restoration teams can develop targeted repair plans that prioritize safety and efficiency.
Identification of Hidden Hot Spots
Even after a fire has been extinguished, hot spots can linger beneath the surface, posing a risk of re-ignition. Thermal imaging can pinpoint these hidden hot spots, allowing restoration professionals to take immediate action to prevent further damage. By identifying and extinguishing hot spots early on, thermal imaging helps ensure that the restoration process is thorough and effective.
Efficient Moisture Detection
Moisture is a common byproduct of firefighting efforts and can lead to mold growth and structural damage if left untreated. Thermal imaging can efficiently detect moisture in building materials, even in areas that are difficult to access. By identifying moisture sources early on, restoration teams can implement targeted drying strategies to prevent mold growth and minimize long-term damage.
Enhanced Documentation and Communication
Thermal imaging provides visual documentation of the restoration process, allowing restoration professionals to track progress and communicate effectively with clients and insurance companies. By visually demonstrating the extent of damage and the effectiveness of restoration efforts, thermal imaging helps build trust and transparency throughout the restoration process.
In conclusion, thermal imaging is a powerful tool that offers numerous benefits in fire damage restoration. From early detection of hidden damage to accurate assessment of structural integrity, thermal imaging helps restoration professionals work more efficiently and effectively. By leveraging this technology, SERVPRO® teams can provide comprehensive restoration services that ensure homes are restored to their pre-fire condition safely and efficiently.
Mold in Vacation Rentals: Ensuring Guest Safety
3/13/2024 (Permalink)
 When it comes to vacation rentals, guest safety and satisfaction are important. One potential issue that arises in vacation rentals is mold growth.
When it comes to vacation rentals, guest safety and satisfaction are top priorities. One potential issue that can arise in vacation rentals is mold growth. Mold not only compromises the structural integrity of the property but also affects the overall experience for guests. In this blog, we will explore how mold can show up in vacation rentals, the signs to look for, and how to ensure guest safety when it comes to mold damage.
How Mold Shows Up in Vacation Rentals
Mold can sneak into vacation rentals due to various factors, such as poor ventilation, high humidity, water leaks, or inadequate maintenance. Some common areas where mold may show up include:
- Bathrooms: Bathrooms are prone to mold growth due to the high moisture content. Look for mold in areas such as showers, bathtubs, sinks, and tile grout lines.
- Kitchens: Mold can develop in kitchens where there is frequent water usage and poor ventilation. Check areas around sinks, dishwashers, refrigerators, and under countertops.
- Basements and Crawl Spaces: These areas often have higher humidity levels, making them susceptible to mold growth. Inspect basement walls, floors, and any exposed piping for signs of mold.
- Appliances: Faulty or leaky appliances like air conditioners, washing machines, or water heaters can create a favorable environment for mold growth. Regularly inspect these appliances for any signs of leaks or moisture buildup.
Signs of Mold Damage
It's important to recognize the early signs of mold damage to take timely action. Look for the following signs indicating the presence of mold in vacation rentals:
- Visible Mold: Observe any visible mold growth, which can appear as black, green, or white spots on walls, ceilings, or other surfaces.
- Musty Odor: Mold often produces a distinct musty smell. If guests notice a persistent musty odor, it may indicate hidden mold growth.
Ensuring Guest Safety
To prioritize guest safety and provide an enjoyable experience, vacation rental owners and managers should take the following steps:
- Regular Inspections: Conduct regular inspections of the property to identify any signs of mold damage. This includes visual assessments of areas prone to mold growth, such as bathrooms, kitchens, and basements.
- Prompt Repairs: Address any water leaks, plumbing issues, or other sources of moisture promptly to prevent mold growth. Regular maintenance and repairs can help eliminate potential triggers for mold development.
- Effective Ventilation: Ensure proper ventilation in areas of the property that experience high humidity, such as bathrooms and kitchens. Install and maintain fans and ventilation systems to circulate air and reduce moisture buildup.
- Educate Guests: Provide information to guests about preventing mold damage during their stay. Include tips on proper ventilation, avoiding excessive moisture, and reporting any signs of mold or water damage.
- Professional Mold Remediation: If mold is detected, consult a professional mold remediation company like SERVPRO® for proper assessment and remediation. Their experts can effectively remove mold, prevent further damage, and provide guidance on preventing future mold growth.
By following these steps, vacation rental owners can ensure guest safety and maintain a positive reputation for their properties.
Protect Your Vacation Rental
Mold growth in vacation rentals can impact guest safety and overall satisfaction. Being proactive in preventing mold damage is essential for property owners and managers. Regular inspections, prompt repairs, effective ventilation, educating guests, and professional mold remediation can help prevent and address mold issues, ensuring guest safety and a pleasant vacation experience.
If you suspect mold in your vacation rental, contact SERVPRO® for professional mold remediation services. Their experienced technicians can assess the situation, remove any existing mold, and provide guidance on how to prevent future mold damage.
Remember, ensuring guest safety should always be a top priority, and addressing mold issues promptly is crucial in maintaining a high-quality vacation rental property.
Common DIY Water Damage Restoration Mistakes to Avoid
2/14/2024 (Permalink)
Facing water damage in your home demands immediate attention and action. Many homeowners take the initiative to handle the restoration themselves, but certain oversights can lead to further issues. Let's explore some common mistakes to steer clear of when during DIY water damage restoration:
1. Lack of Proper Tools
An often underestimated aspect is the importance of having the right tools. Relying solely on household items may fall short in effectively removing water and drying affected areas. Invest in or rent professional-grade equipment like water extractors, dehumidifiers, and air movers to ensure a thorough cleanup.
2. Underestimating the Damage
Believing that water damage is inconsequential can be a huge mistake. Even seemingly small incidents can escalate into significant problems if not addressed quickly. Neglecting water damage or assuming it will resolve itself could lead to mold growth, structural issues, and other concerns.
3. Rushing Through Cleanup
Rushing through the cleanup process without ensuring proper drying and disinfection is counterproductive. Inadequate drying may leave hidden pockets of moisture, allowing mold and mildew growth to flourish. Take the time needed to thoroughly dry all affected areas, including those harder to reach.
4. Inadequate Water Extraction
Standard household tools like mops and buckets might seem sufficient but often fail to extract water thoroughly. Leaving excess water can lead to persistent moisture which allows mold and mildew to grow. Utilize professional-grade water extraction equipment for a more effective cleanup.
5. Overlooking Proper Disinfection
Water damage introduces various contaminants and bacteria. Simply drying the area won't suffice; thorough cleaning and disinfection are crucial to prevent mold growth. Use suitable disinfectants to sanitize all affected surfaces.
6. Neglecting Safety Measures
Water damage restoration involves potential hazards like electrical risks, contaminated water, and unstable structures. Prioritize safety by turning off electricity in affected areas, wearing protective gear, and being cautious of slippery surfaces and weakened structures.
When tackling water damage restoration on your own, avoiding these common errors is crucial. Quick action, the right tools, thorough drying, proper disinfection, and, when necessary, seeking professional guidance are key elements for successful restoration. Remember, your home's well-being and value are at stake, and handling water damage promptly and correctly is crucial for long-term safety and preservation.
The Importance of Cleaning Gutters and Drains Before a Storm Hits
1/8/2024 (Permalink)
 When the wind starts howling and the thunder rolls, it's not just the force of nature that homeowners need to worry about.
When the wind starts howling and the thunder rolls, it's not just the force of nature that homeowners need to worry about. Neglected gutters and drains can wreak havoc during stormy weather, leading to significant property damage. Let's discuss why it's crucial to clean gutters and drains before a storm hits.
Prevention: The Best Cure
Your gutters and drains serve as the primary drainage system, guiding rainwater from your roof and away from your home’s foundation. When these become clogged with leaves, twigs, or other debris, things can go south, and fast:
Roof Damage: A clogged gutter can cause rainwater to back up and seep into your roof, leading to roof leaks and potential water damage in your attic or through your ceilings.
Foundation Problems: Blocked drains tend to overflow, causing water to pool around your house’s foundation. This could lead to structural weakness, cracks, or worse, basement flooding.
Invited Infestations: Standing water acts as a breeding ground for mosquitoes, mold, and other unwelcome guests, posing risks for your occupants.
A Simple Solution: Regular Cleanup
Regular gutter and drain cleaning can protect your home and save you from future storm damage and costly repairs. But how often should you clean them out?
The frequency depends on your local weather and vegetation - if you have many trees shedding leaves and debris, semi-annual cleaning is recommended. If you live in a relatively clear area, a yearly inspection and cleaning before storm season is typically enough.
A Helping Hand: SERVPRO®'s Services
While consistent gutter and drain cleaning can help prevent disaster, sometimes property damage is unavoidable in the face of a severe storm. That's when SERVPRO® of Worcester steps in. Our expert services extend beyond mere cleaning - we are your one-stop-problem-solvers for storm and water damage restoration. We employ advanced technology and proven techniques to restore your property, making it "Like it never even happened."
By embracing the importance of routine gutter and drainage cleaning before storms hit, you can avert serious damage to your home and associated expenses. And remember, should the storm leave you in need of professional cleanup and restoration, our SERVPRO® team is here to make it "Like it never even happened." Stay prepared and take proactive measures - because when it comes to storm damage, prevention truly is the best cure.


 24/7 Emergency Service